
Repurpose your old plastic greenhouse to make small greenhouses on crates.
In this post I will give you a simple DIY solution for repurposing your broken or ripped plastic greenhouse into small mini greenhouses on top of old plastic crates. These mini greenhouses will help you in the garden with your early season needs. You will be able to keep small seedlings warm(er) and dry while they are most fragile. It’s a straight forward tutorial, you won’t need a lot of tools and you’ll be able to make them in an hour or so, without additional costs with mostly re-used materials. Let me explain how I came to the idea, how I made them and how I use them right now.
THE NEED
All gardeners start their greenhouse adventures with one of those blue/green plastic hoop houses, don’t they? Well, we did! And as with many of those hoop houses, ours flew away, broke apart and became useless within the first or second year of its existence. After multiple taping together adventures, we just gave up and wrapped the thing up and set it aside in our garage, thinking that one day we might use the plastic that was left. And although I was tempted to replace the greenhouse on several occasions, my partner always made sure that I didn’t, reminding me of how horrible of an idea that was.

Over the years that followed my gardening evolved. I worked around not having a greenhouse. I started using different tools and methods in my seed sowing adventures. In this process I acquired and used many crates to collect, organise and move my seedlings easily around the garden and into the house whenever needed. I got them for free from the vegetable market stall holders (they just throw them away at the end of a market day).
I also started moving away from single use plastic in the garden and therefore bought soil-block makers to grow seedlings. And with that I stumbled upon a new problem. For those of you who already work with soil-block makers, you will recognize this problem: it’s very hard to leave these soil blocks outside in ‘the weather’, especially if it rains. They basically fall apart with heavy rain if they are not put under cover. So I came to the conclusion that I needed something like a greenhouse again!
THE IDEA
And that’s how I stumbled upon our old greenhouse. While thinking about an easy solution I realized that I could make mini greenhouses out of the big sheets of plastic of the old greenhouse. That would make my crates even more useful and flexible.
I didn’t want to make it too complicated though, as I didn’t know if it would work and how long they would hold out (having the disaster of the original greenhouse in mind). I also didn’t know if I would like the look of all that plastic in the garden. At first I was thinking of neatly sewing the sheets into the right size, but soon I realized that it was probably enough to just staple them together! And that’s how my idea was born.

TUTORIAL
WHAT DO YOU NEED:
- old greenhouse plastic
- repurposed vegetable crates (you can use wooden ones too)
- scissors
- stapler
- staples

HOW TO:
Assuming that you have only one size crates (I have two sizes, so I needed to do this twice), measure out your first crate and after that you use that sheet as a template to cut the other sheets. Measure it out like shown below. You will need to cut out a rectangular cover that will be as big as the upper side of the crate and then a bit more as it will have to fall over the sides, down to the bottom. Just above the bottom actually. I did my measuring and cutting freestyle. I didn’t use measuring tape or such. You can make it as precise as you want it to be.


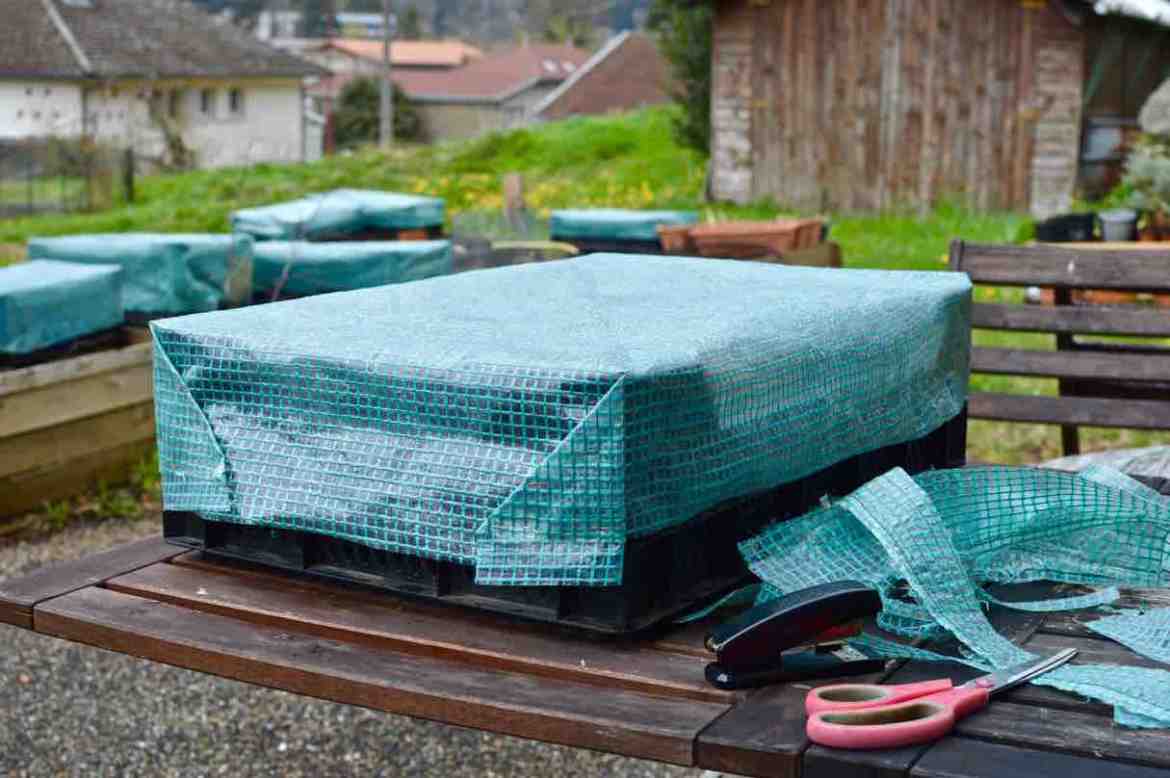
I then basically wrapped the crate as tight as I could – as a gift? – and stapled the plastic sheet on the bottom side of the cover, putting two or three staples on each corner. And that was that! Well, I repeated this about 20 times, but then that was it!
You want to do this wrapping as tight as possible, as you don’t want water to build up on top. Also, you don’t want wind to swoop away the cover. Ideally it’s very tight, but not too tight so that you can’t easily get it off and on.

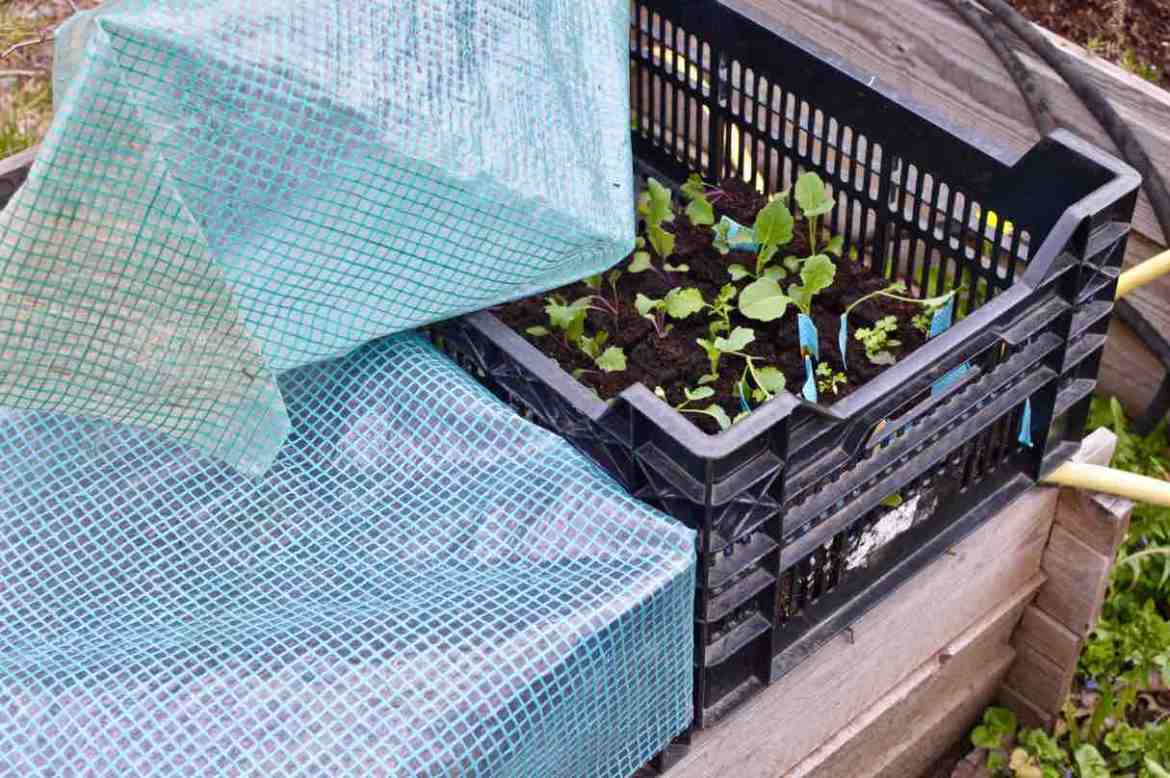
THE USE
As said, I use them for both my soil blocks as rain protection, but also for my heat loving veggies, like pumpkins, peppers etc. It’s the second year in a row that I use them and I really love them. I don’t even mind how they look in the garden. It’s also for only a short period of time in the season that I have to use them, so that’s acceptable. Most often they are also sitting without a cover in the garden during day. Sucking up all the sun available. In the evening and in humid periods I cover them up again to keep them warm(er). And when the weather warms up enough, I just wrap them up and put them away in the garage.

I hope that this simple DIY helps you to meet your basic greenhouse needs without having to resort to buying one more useless plastic greenhouse. I you find it too difficult to make it yourself, you can always resort to buying this (much more expensive) kit. Let me know if you try this out, I am curious to hear how it works out for you!

The Author
You Might Also Like


May 7, 2020
Hello,
When you use soil blocks, do you repot them as the plant gets too big for the soil block or do you plant them out directly into your garden with no re-potting involved?
I have sown some kale in soil blocks and have planted a few out with a half bottle as a cloche – some are eaten but slugs but others are growing on well. I want to know if it is possible to avoid the repotting stage.
Best wishes,
Michele.
May 7, 2020
Hi Michele,
Thank you for your question.
First of all, it depends on which size soil blocks you use. I would say if you use the mini blocks (1cm) you will need to repot, especially because you don’t want tiny plants in a garden where snails and slugs are very present. If you use the mid size blocks (about 4cm?) I don’t think you need to pot on. I don’t repot with that size when it comes to kale (I do repot to a bigger size (my biggest block maker is 10cm) with tomato, pumpkin, courgettes and other types of veggies).
I know kale and other cabbage/brassica’s love a tight soil, so it’s just important to keep them compressed if you pot on or just plant them.
I mostly repot for two reasons: 1. if the plant is to big to stay in the pot and the weather isn’t warm enough to plant out. 2. the plant is too big for the pot, but not big enough to plant out, due to slug attacks (I have that problem mostly with pumpkins and courgettes, they have to be really big before I plant them out).
I hope this helps. But I think what you do is already good, you will always lose some to wildlife! :)
Enjoy your day,
Marta
February 15, 2021
Brilliant idea .wondered what to do with the same plastic due to blown away green house.